Graduation Thank You

The summer was full of graduations and all the fun that brings.  After my son’s graduation party in late June it was time for him to thank everyone who came and/or gave him a gift.  As most 18-year-old boys are, he wanted no frills.

The new Thank You Thinlit was exactly what we needed.  And the new Merry Merlot layered with Basic Black was a perfect match to his high-school colors.  Using the Note Cards & Envelopes made assembly easy and he was happy that he didn’t have a large card to try to fill.

Still A Favorite!

This is a card we made for last year’s spring card class.  I just love the stained glass technique using the watercolor pencils and blender pens on vellum.

When I needed a birthday card for a cousin in the middle of February, as we were dealing with ice outside, I decided that I was ready for spring.  I went back to this favorite using the Detailed Dragonfly Thinlits cut from Dazzling Diamonds Glimmer Paper.  The dragon flies are then backed by the stained glass vellum to subtly bring the colors together.

I’m feeling warmer already!

It’s Time to SaleABrate

Sale-A-Bration is the biggest sale of the year! You can earn free, exclusive products with every qualifying order.

For every $50 you spend, you’ll receive a free Sale-A-Bration product. For anyone who has enjoyed Sale-A-Bration in the past, we have an exciting new announcement for this year: We now have a new reward level, giving you more flexibility and options for your free items.

Let’s break it down:

  • If you spend $50 you get one free level 1 product.
  • If you spend $100 you get one free level 2 product, OR, they can choose two level 1 items.
  • If you spend $150 you have the option to choose three level 1 items or one level 1 item and one level 2 item.

This new option allows everyone to create a personalized Sale-A-Bration experience.

Check out all the fun Sale-A-Bration products here!

Merry & Bright Treats

It’s time for Christmas treats for the teens!  When I saw the Mini Pizza Boxes in the Holiday Catalog I knew I wanted to do something with them for this years Christmas treats.  I had purchased Festive Phrases stamp set for the adorable elf, but the Merry & Bright stamp seems perfect for this project.

The Layering Squares Framelits worked well with this stamp and layering it on a scalloped square.  Finally, I embellished it with some Be Merry DSP and Real Red 1/8″ Solid Ribbon.  For a some shimmer I added a little Wink of Stella to the lights after coloring them Real Red and Garden Green with the Stampin’ Write Markers.

Now to get baking some delicious cookies to fill them with!

Favorite Things Gift Exchange


It’s the most wonderful time of year!  Every year our Stampin’ Up! team does a Favorite Thing gift exchange.  We each purchase one of our favorite things and wrap it in a creative way.

Picking my favorite thing was easy.  I have fallen in love with the Yankee Candle WoodWick Trilogy candles.  I made my purchase on Thanksgiving weekend.  Then to come up with a way to wrap this not square item.

I thought about it a lot and finally found the Small Round Craft Gift Box at The Container Store.  I searched though my stamp sets to find a way to decorate the box.  As I drove home from the store, it hit me.  So, when I got home I pulled out my paper and Tear & Tape Adhesive and got busy.


Christmas Lamppost

Here’s another card that the attendees of our Christmas Card class got to make last weekend.

This one was made using the Brightly Lit Christmas bundle.  The card base is made by layering the Whisper White card stock with a piece of Merry Music Specialty DSP.  The lamppost pieces and the banner were cut out using the Christmas Lamppost Thinlits.  The banner was stamped using the Brightly Lit Christmas stamp set.  Given that this is a photopolymer set, attendees were able to stamp on the already cut banner.  All the pieces were attached to the card base and a simple Real Red 1/8″ Ribbon bow was added to the lamppost.

It’s Beginning to Look A Lot Like Christmas

It’s the first week of November and we are starting to think ahead to Christmas.  This past weekend I co-hosted a Christmas Card class with two demonstrator friends.

Here is one of the cards that everyone made using the new Christmas Quilt suite of products.  I absolutely love how everything coordinates so well.  The Whisper White layer of the card base was embossed using the Quilt Top Textured Embossing Folder.  The quilt piece was made using the Layering Squares Framelits to create the scalloped base.  Then the Quilted Christmas DSP was cut using the square from the Quilt Builder Framelits.  Finally, the quilt pattern was cut, again using the Quilt Builder Framelits.  These were layered and then adhered to the card front using Stampin’ Dimensionals.  For a little bling a 5mm Rhinestone Basic Jewel was added to the center of the quilt square.   The greeting on the front and the sentiment on the inside were stamped from the Christmas Quilt stamp set.  You can bundle and save when you purchase the Christmas Quilt stamp set and Quilt Builder Framelits Bundle.

They’re Never Too Old for Halloween Treats

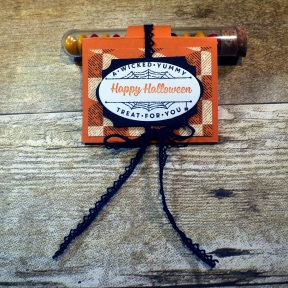
October is finally here and hopefully soon we’ll have some fall weather.  When the Holiday Catalog came out I saw the Treat Tubes and knew immediately I wanted to use them for the treats that I send to my college daughter to hand out.

I ordered the Treat Tubes and all the other supplies from the same page on my preorder without knowing what I would do with them.  I had thought I would do some kind of tag, but when I saw some fun wraps I knew I had to give them a try.  So, I cracked out the Spooky Cat stamp set which coordinates with the Cat Punch and the Everyday Label Punch.  I’m really getting my moneys worth out of that Everyday Label Punch!

These really were easy.  Which was good because my son who is a senior in high school came in while I was making them and hinted that “my friends like candy too”.  So, I quickly doubled my efforts.  Good thing I ordered several boxes of those treat tubes.

The wrap is a piece of Pumpkin Pie card stock scored and cut to allow the treat tube to slip in.  The front is decorated with Spooky Night Designer Series Paper.  The inside has a piece of Whisper White card stock with Trick or Treat stamped in Pumpkin Pie.

For the label, I started by stamping A Wicked Yummy Treat For You in Basic Black and then centered the Happy Halloween in Pumpkin Pie on Whisper White card stock.  I then cut that out using my Layering Ovals Thinlits.  Then I punched that Everyday Label out of Basic Black card stock.

Finally, I wrapped Vintage Crochet Trim around the whole thing and centered the label on the front using Stampin’ Dimensionals allowing the Crochet Trim to pass between the Dimensionals.

Red Dress Gala – Chocolate Bar Sliders

My wonderful daughter is in charge of this year’s Alpha Phi Red Dress Gala to benefit women’s heart health at Creighton University. One of the fund raisers they have is a balloon pop. Gala attendees can purchase a balloon and at a certain point of the evening everyone pops their balloon to see what number is inside. That number coincides with a prize. Because they have changed the venue this year, they cannot have any balloons. This called for a little creativity.

I cracked out Merry Little Labels bundle from the new Christmas Catalog. The “No Peeking” stamp was perfect for the occasion and the Everyday Label Punch pairs with the stamp making things easy. I also used the Layering Squares Framelits, cut once and then slid it over to cut again to make the scalloped rectangle. The Sweet & Sassy Framelits were used to cut the hearts (for heart health of course).  Then, I added just a little bling with the Black Rhinestone Jewels.  Finally, for an added surprise, I used the Beautiful You stamp set to dress up the candy bar wrapper on the inside.